· tanstack-form · 5 min read
TanStack Form: Setup and simple validation (with shadcn/ui)
Let's see how to setup a form with TanStack Form using components from shadcn/ui, and add some simple validation rules.

Forms are not an easy business 🤯
Luckily there are many libraries helping out with that and today let’s see up close how to setup a form with TanStack Form, the form library in the TanStack ecosystem.
It works on React, but also Angular, Vue, Solid, and Lit.
It’s Headless so you can use it with whatever UI components you have in your project and as with everything in TanStack it’s type-safe! In this example we’ll use components from shadcn/ui to build the form but you can really make it work with any UI library.
Worth mentioning it’s probably not production-ready yet, but if you’re curious it definitely deserves a try (maybe on side projects) and feedback can indeed help get to v1, which should happen soon 👀
Discover all 34 tutorials I've created on Form and other TanStack libraries for web developers
Browse TutorialsAbout This tutorial

My idea is to cover this library in 3 steps. The first one (this article) is about setting up the library and adding some simple validation rules. The second one will be about more complex validation rules and the third one about handling arrays and dynamic fields.
You can already find the video version for chapter 1 here:
Setup
As usual, everything begins with an installation:
npm i @tanstack/react-form
Notice here that we are installing @tanstack/react-form, if you’re using Angular, Vue, Solid, or Lit you should install the respective package.
And… that’s it! No particular setup is needed, you can start using it right away.
Form
Let’s imagine we’re starting from this uncontrolled form in our component:
<form className="flex flex-col gap-4">
  <div>
    <Label htmlFor="username">Username</Label>
    <Input id="username" type="text" />
  </div>
  <div>
    <Label htmlFor="passowrd">Passowrd</Label>
    <Input id="password" type="password" />
  </div>
</form>
To add the magic, we can call the useForm hook and get our form instance.
const form = useForm({
  defaultValues: {
    username: '',
    password: '',
  },
  onSubmit: (values) => {
    console.log(values);
  },
});
To avoid unexpected side effects, let’s prevent the default form submission:
<form
  className="flex flex-col gap-4"
  onSubmit={(e) => {
    e.preventDefault();
    e.stopPropagation();
  }}
>
  ...
</form>
Input
It’s now time to integrate the inputs with the form, through the Field api exposed by TanStack Form.
<form.Field
  name="username"
  children={(field) => (
    <>
      <Label htmlFor="username">Username</Label>
      <Input id="username" type="text" value={field.state.value} onChange={(e) => field.handleChange(e.target.value)} />
    </>
  )}
/>
Same goes for the password field, we’re basically passing our inputs as children of the Field component and we’re using the field object to get the value and the handleChange function.
Submit & Reset
To submit or reset the form, the api exposes form.handleSubmit and form.reset.
The easiest way to submit a form is to add a button with type="submit" and call form.handleSubmit on click.
<button type="submit" onClick={form.handleSubmit}>
  Submit
</button>
As an alternative, you can indeed add form.handleSubmit to the onSubmit event of the form.
And to reset the form, we can call form.reset on click.
<button type="reset" onClick={form.reset}>
  Reset
</button>
note: in the video it’s slightly different because the buttons are outside the form in a CardFooter component, but the idea remains the same:
<CardFooter className="flex justify-between">
  <Button variant="outline" onClick={form.reset}>
    Reset
  </Button>
  <Button onClick={form.handleSubmit}>Sign Up</Button>
</CardFooter>
Validation
The Field component also accepts a validators object where you can define a function returning the errors, that can be run at the desired event.
Currently supported are: onBlur, onChange, onMount and onSubmit.
Our username can be validated as follows:
validators={{
    onChange: ({ value }) => value.length < 3
        ? "Username must be at least 3 characters long"
        : undefined,
}}
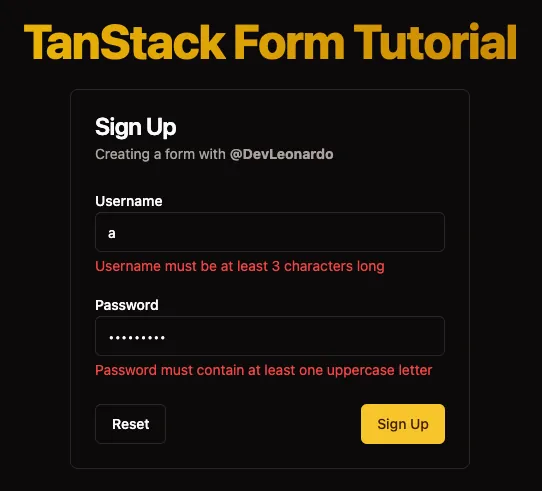
With that, you’ll notice that if you try to submit the empty form… nothing happens! That’s because we’re not showing the errors yet.
In general, errors are inside field.state.meta.errors. You can also know where they come from (which event in the validation) but let’s keep it simple for now. Let’s add this right below the input:
{
  field.state.meta.errors && <p className="text-red-500 text-sm mt-1">{field.state.meta.errors}</p>;
}
The password validator can be a bit longer, to show better error messages:
onChange: ({ value }) => {
    if (value.length < 6) {
        return "Password must be at least 6 characters long";
    }

    if (!/[A-Z]/.test(value)) {
        return "Password must contain at least one uppercase letter";
    }

    if (!/[a-z]/.test(value)) {
        return "Password must contain at least one lowercase letter";
    }

    if (!/[0-9]/.test(value)) {
        return "Password must contain at least one number";
    }
},
Async validation
At this point, each time a value is changed, the validation function is called and the errors are shown. But what if we want to validate the username against an API or if we simply want to avoid running it that often?
As easy as turning onChange to onChangeAsync and adding an extra property called onChangeAsyncDebounceMs.
This already works!
Validation libraries
TanStack Form also supports integration with popular validation libraries like Zod, Yup and Valibot through adapters. We’ll see that on chapter 3 (or you can check the docs).
Conclusion
This was a quick overview of how to setup a form with TanStack Form and add some simple validation rules. Stay tuned for the next chapters where we’ll see more complex validation rules and how to handle arrays and dynamic fields… and even more topics if you like it too!
As mentioned in the intro, the form isn’t production-ready yet but being in the TanStack ecosystem is a good sign that something interesting might come out of it.
If you want to support the development of the project you can contribute to the GitHub Repo as I’m doing. You’ll also find some previews such as this PR which will extend the validation feature.
The source code of the demo created with this article is also available on GitHub (Balastrong/tanstack-form-demo) and will get updated with the next chapters.
Last call, if you want to see it in action, you can watch the video version of this article on my YouTube channel: TanStack Form: Setup and simple validation (with shadcn/ui).
Discover all 34 tutorials I've created on Form and other TanStack libraries for web developers
Browse Tutorials
Hello! My name is Leonardo and as you might have noticed, I like to talk about Web Development and Open Source!
I use GitHub every day and my favourite editor is Visual Studio Code... this might influence a little bit my content! :D
If you like what I do, you should have a look at my YouTube Channel!
Let's get in touch, you can find me on the Contact Me page!


